Rules    FAQ
User: Guest ( Register )


It is currently Thu Nov 28, 2024 11:41 am (All times are UTC - 5 hours [ DST ])


Forum rules


  • This section is for honest critique of the work shown here. Members are encouraged to give and accept non-confrontational constructive criticism as well as adoring praise and everything in between.
  • In order to show case everyone's work equally, please post multiple customs on the same day into a single thread. If you have a lot of pictures of your work you may have to add them to a separate post within that thread.
  • Please do not link to a sale thread or to eBay from your critique thread. This section isn't to be used to market your finished work. The Market Place section is better suited for that purpose.


Forum locked This topic is locked, you cannot edit posts or make further replies.  [ 5 posts ] 
Author Message
 Post subject: Tomahawk WIP
PostPosted: Mon Oct 19, 2009 5:38 am 
User avatar
Formerly Suburbanator

Joined: Sun Apr 26, 2009 1:21 am
Location: The PacNW
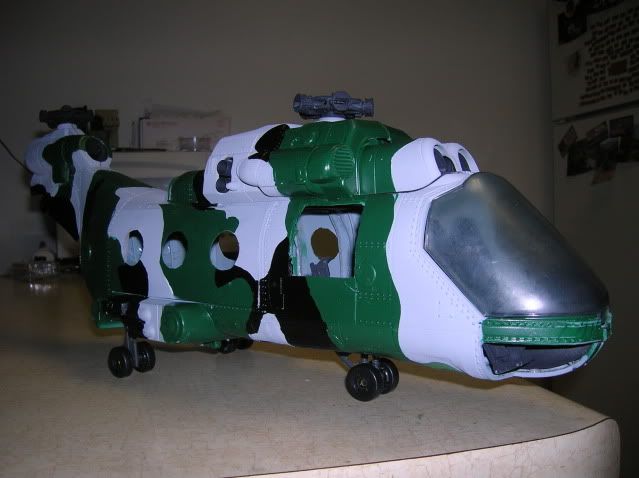
This is my custom Tomahawk so far...

First off, I've got to give recognition to Wild Bill over at JoeDios, aka RJ from the Cobra Stickers site. Although I had most of the ideas in my head for this project, he was willing to help me out with a few design ideas.

If anything, I'll walk away from this one knowing that a little bit of Green Stuff goes along way. For the interior I used far more of it than I really needed to. Now I know...

Before I knew how involved with this I wanted to get, I had removed the windows and what not and painted it grey. I decided to get a bit more involved, so I split it apart and cut the flight deck from the cargo deck. I wanted to lower the cargo deck so the figures could fit in there a bit better. I cut out a window and crew door where the bomb winglets were located.
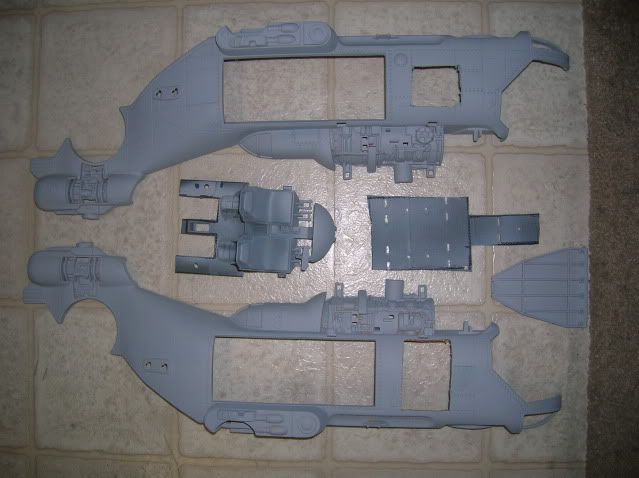
Image

I used some styrene sheets and cut them to size for the large side openings, as well as the chin turret hole. To help the styrene hold the contour of the fuselage, I taped it on the outside. Using some Green Stuff, I lined the opening. I cut some ribs out of cardboard to give the cover some rigidity.
I used Green Stuff to fill in the recessed areas where the large missiles were mounted as well as the depression around the chin turret. I also used a little bit of Green Stuff to fill in the holes left by the rear stabilizers. You can also see where I cut out the "Hell Hole" in the bottom between the landing gear nacels.
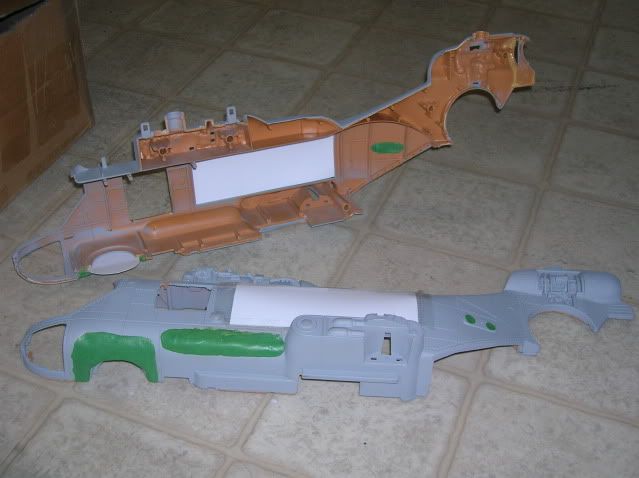
Image

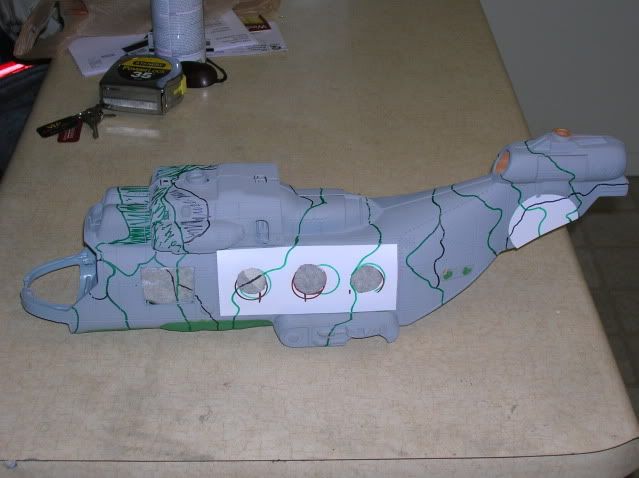
Before painting, I used different coloured Sharpies to mark off where I wanted to paint what colour. I remember this being a pain back in the day when I painted models; trying to keep the lines striaght from one side to the other, and making sure you get the colour on the same side of the line on each side. You can also see where I covered the space where the tail fan goes. I used the tail fan itself as a template and cut out the shape from styren and secured it in place with Gorilla Glue and Green Stuff.
Image

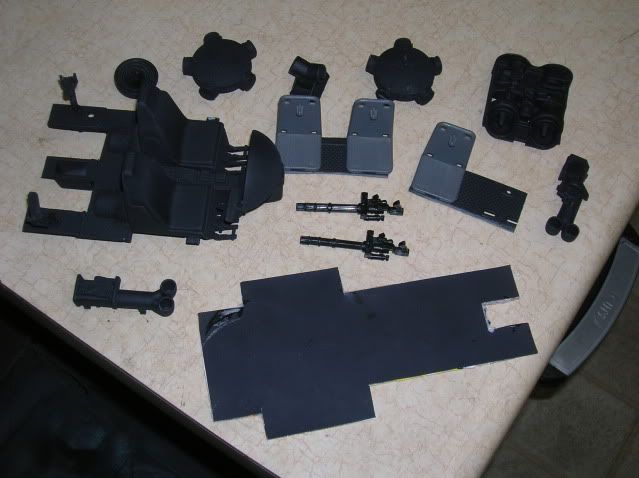
These are the interior parts. The flight deck, cargo floor, engine components and mini-guns for the side windows. Using the guns that come with the Tomahawk, I cut the gun from the mount and left a small platform on which to mount the Marauder mini-guns. I left part of the cargo deck in tact behind the seats and drilled holes so the gun mounts could be mounted.
I had planned on using the regular cargo deck for the inside, but I can't cut straight lines for crap with my Xacto saw (see first picture), so I made a template out of card board that would cover the whole area. Using that template, I cut out the shape in styrene and used the card back from a figure for some strength to the styrene, as regular cardboard was just a bit too thick for what I wanted.
Image

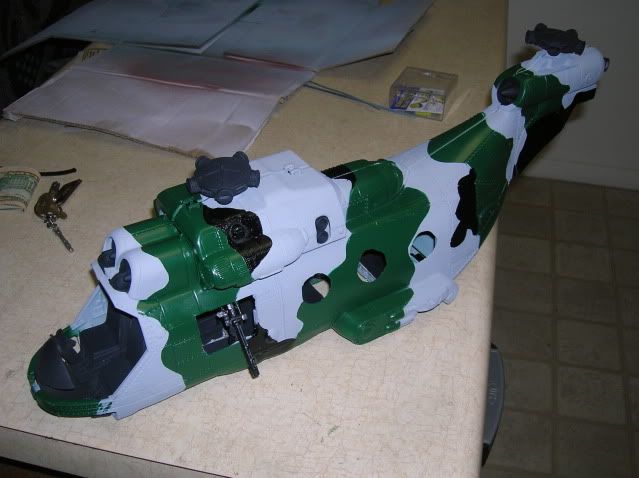
Here it is after the primary painting has been applied. I still need to go back and touch up a few missed spots.
Image
Image

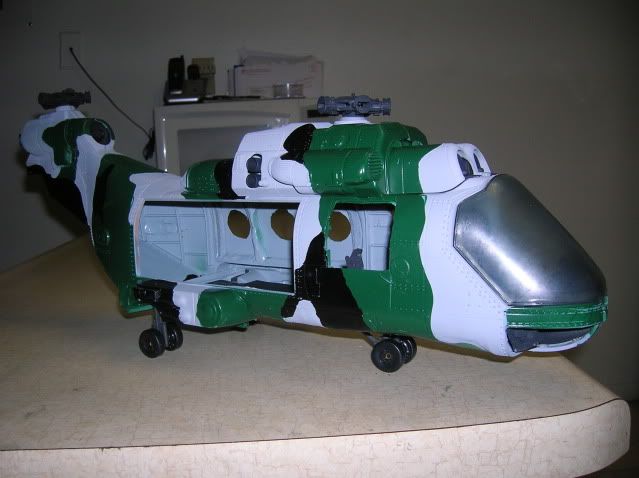
Here is the side with the removable cover. I used some more cardstock from a figure card back and lined the edge of the opening. The Green Stuff was applied to this lining instead of the fuselage itself (like on the other side), this way the side can be removed. I also made a small half door for the lower part of the crew door. I need to get some more thin wire and I can make a bit of a hinge so it'll fold down and act as a ladder to board the helo. You can see the top of the gun mount poking up over the top of the half door.
Image

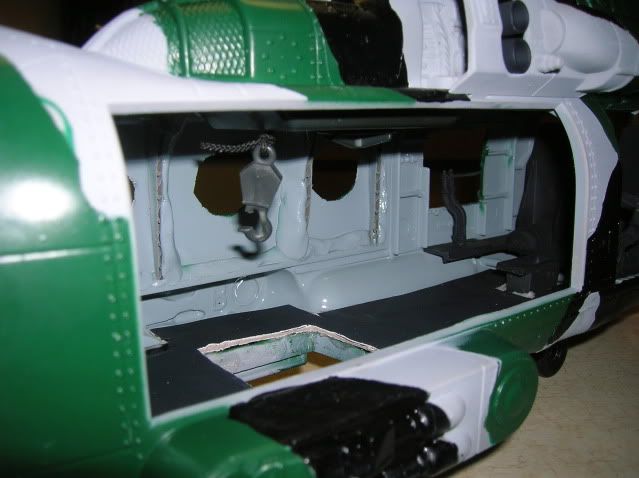
Here's the interior. I removed the winch from the bottom and Gorilla Glued it to the overhead in the cargo area so the guys can fast rope through the Hell Hole. I have a couple of plans to add some seats. You can see the port side gun mount by the front window.
Image

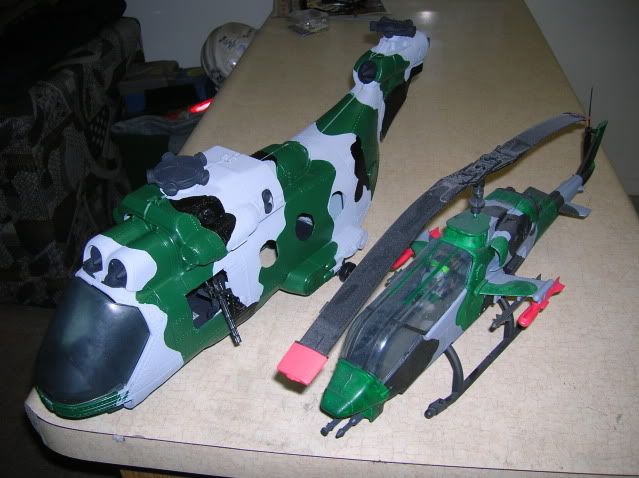
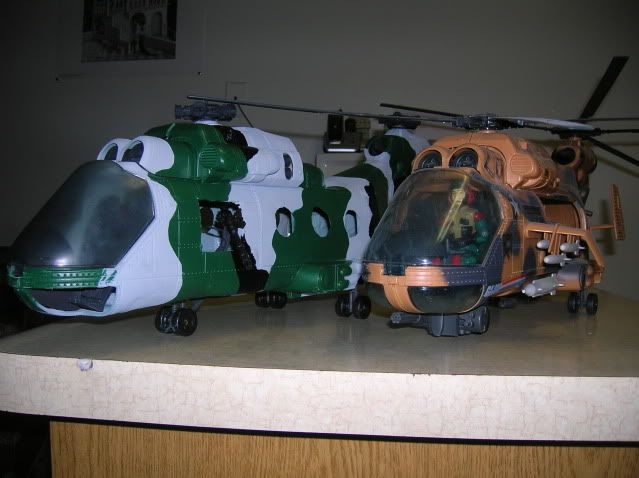
Couple pictures with a Tomahawk and custom Tigerfly
Image
Image

I still have a few more things to add, add some dull coat, custom decals and few other items.

_________________
Some people, when trying to avoid thinking about those things that cause them pain, turn to drink, food, or drugs...I turn not to any of those...I collect action figures. Over the years, I've found that alcoholism is much more socially acceptable by far.


Top
 Profile Customs Feedback / Brawlingness  
 
 Post subject: Re: Tomahawk WIP
PostPosted: Mon Oct 19, 2009 11:51 am 
User avatar
Cool after molding
Cool after molding

Joined: Tue Jun 26, 2007 10:19 am
Location: Wadsworth OH
I like what you're going for here...makes a pretty good looking vehicle. I've been working at adding doors to a T-hawk for a while...I've not been able to get the styrene to match up that well for me.

I don't like the primer/grey color...I think it's got a bit too much blue in it to work with the Green/Black cammo.

Ditching the wings for the door and gunner's hole was a risky idea...but I think it work quite well...Not sure about the chin gun....without that space filled the T-hawk looks a bit odd.

The only other thing I'd like to see you do is clean up the inside a little bit more...the greenstuff on the inside of the door for reinforcing, and the empty space for the wheel bump-out both look a little sloppy...I like that you dropped the floor but you need to fill in the spaces it used to cover up

_________________
Are you interested in my Custom Castings?

Check out what I'm able to do in the Commission's section.


Top
 Profile Customs Feedback / Brawlingness  
 
 Post subject: Re: Tomahawk WIP
PostPosted: Mon Oct 19, 2009 1:11 pm 
User avatar
Special Limited Edition Co-Host / Membership Has Its Privileges

Joined: Mon Nov 19, 2007 3:31 pm
Location: Fort Wayne
I dig it man. the amount of time you put into this is impressive, and it's great that you took the pics to help us out as you did it. I agree with Nova about the inside needing cleaned up just a touch, but I know you're not done yet, and seats will make a big difference. I do see a small mark you can probably fix on the right side front, where it looks like the outline you drew doesn't match the paint? Or maybe I'm just seeing things.

_________________
Kwinn_Lives wrote:
you have now won more JCAs than anyone in the history of the award.

Mysterious Stranger wrote:
You sir are the definition of a Renaissance Nerd... you do it all so damn well.


Top
 Profile Customs Feedback / Brawlingness  
 
 Post subject: Re: Tomahawk WIP
PostPosted: Mon Oct 19, 2009 1:27 pm 
User avatar
Plug
Plug

Joined: Tue Jun 26, 2007 10:19 am
Location: Maryland
I like the modifications on the outside. I think they look really clean considering what you did. The inside is a little rough but with seats and some paint I don't they will be that noticeable.

However, I do agree with nova about the primer, green and black not looking right together. The forest green is so bright and the primer does have a dull blue tint to it. If you had done dark grey or even sky blue instead of green, or woodland brown instead of grey, I think it would work. The green and grey together is jarring.

_________________
:hijm70:


Top
 Profile Customs Feedback / Brawlingness  
 
 Post subject: Re: Tomahawk WIP
PostPosted: Mon Oct 19, 2009 5:43 pm 
User avatar
Formerly Suburbanator

Joined: Sun Apr 26, 2009 1:21 am
Location: The PacNW
Thanks for the input.

The colour scheme is based on the real camo used on Marine Corps helos. I believe it is called West European Marine (marine as has having to do with water, not Marine Corps). Once I shoot it with some dull coat, the green will look less shiny. I was also going for a look more like a CH-46 Sea Knight and less like a Tomahawk.
Image
Image

There are a few places where the Sharpie shows through that need to be touched up, like on the front green area. The Green Stuff is not quite as nice as I'd have liked, but it is the first time I'd ever used the stuff and I haven't done a whole lot of sculpting since 8th grade.

As far as the interior, I thought about using Green Stuff to join the deck and the bulkheads better, but A) I was running low on the Green Stuff and B) I was trying to figure out how to paint the helo, join the two halves of the fuselage together, install the deck and Green Stuff it, then paint the interior without messing up the outside paint and to nicely sculpt the Green Stuff in place. Then my brain started to hurt.
I know I could have easily used half the amount of Green Stuff that I did, , live and learn, probably would have looked a lot cleaner on the inside.

_________________
Some people, when trying to avoid thinking about those things that cause them pain, turn to drink, food, or drugs...I turn not to any of those...I collect action figures. Over the years, I've found that alcoholism is much more socially acceptable by far.


Top
 Profile Customs Feedback / Brawlingness  
 
Display posts from previous:  Sort by  
Forum locked This topic is locked, you cannot edit posts or make further replies.  [ 5 posts ] 

It is currently Thu Nov 28, 2024 11:41 am (All times are UTC - 5 hours [ DST ])


Who is online

Users browsing this forum: Google [Bot] and 50 guests


You cannot post new topics in this forum
You cannot reply to topics in this forum
You cannot edit your posts in this forum
You cannot delete your posts in this forum
You cannot post attachments in this forum

Powered by phpBB © 2000, 2002, 2005, 2007 phpBB Group