How do you make straight arms and leggs bendable?

Got a tip to share? Have a question about the hobby? Need input on parts or weapons? Have great idea for a custom figure or vehicle? Too lazy to do it, or just want to share the idea with others? All that and more goes in here.
Topic is Locked

by Oneforceleader

Ok I have an idea for a custom, but the base figure has straight arms and leggs or rather they don't bend. How can I correct this?

by Darko

You mean like an old SW Potf2 limb that is just molded as one piece? Basically, you need to find a similarly sized figure with good articulation, cut the joints out of that, then graft them onto the figure you want to use as a base.

Here's a decent tutorial. It's designed for larger scaled figures, but the principles are the same.

by nova

Depending on what your base parts, and what style figure you're creating, It may be easier to just take the unique parts of the limbs...usualy the feet and hands...cut them off and graft them to the new base figure...

I did somthing like that with my Furry Balls custom...

http://www.joecustoms.com/customs/custo ... 33&id=4141

I cut off Chewbacca's hands and feet and then carved the limbs down to be workable as lower legs and arms.

by Keenan

That's how I made my Spartans too- the whole figure was static, and I added Microman articulation.

Image

Image

Image

Hope that's of some help.

by joemichaels70

John -- those pictures are awesome, did you post those before and i just missed them?

by Keenan

I had posted those, way back when . . .
viewtopic.php?f=14&t=2147
(Pics are gone from there now).

by J_Man

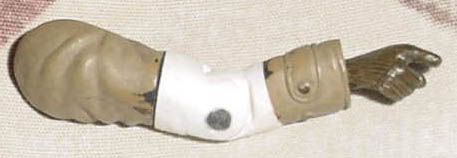
I keep posting this arm for various things, but here it is again:

Image

That's just regular plastic that a glued up. I built some squares up to make a block and glued them on the arm. I was just playing around so there isn't a rotation joint, but that could easily be done.

Anyway I had cut the elbow off the arm previous to this and glues the blocks onto each arm part. I used a dremel to shape the parts so that I could follow the creases and folds of the jacket. I shaped out the sections that matched up to each other so that I could have the joint. I used a piece of plastic and stuck through the arms and sanded the 2 sides flat to the arm. At this point you have a joint that's ready to go.

That's just another option. Naturally getting a figure and cutting the joints off is the easier way to go. It's best to look at dollar stores or something to find cheap figures to get joints off of.

by JBYRDD

With that being said & shown J_Man, how would you go about the shoulder articulation ?

I am very curious about that and would like to see or read what suggestions you or someone else might have.

by J_Man

JBYRDD wrote:With that being said & shown J_Man, how would you go about the shoulder articulation ?

I am very curious about that and would like to see or read what suggestions you or someone else might have.


The way I would do a shoulder would be the same way. I'd draw out the circle joint with a circle stencil and cut it out. I have a band saw though that makes it easy to cut out shapes that I need. Once I had that, I'd build up some more plastic sheets to put on the shoulder of the arm. I'd use the dremel to shape it out and make the fit that I need. Because I would use sheet plastic, I'd be able to make the insert where the "circle" will go before glueing it up. You can make the insert while the plastic is still rough, that part won't matter.

With the joint made, and having the rough plastic glued on, you can shape it to fit the arm. I back tracked after I already said it, but I needed to detail the idea of making the joint. Now you'll have to make the part where it'll fit on the torso of the figure.

To do the torso, agai just figure out how much of a chunk of plastic you'll need. Glue up some peices and carve out the area of the old arm to fit the new plastic in. You'll either have to make a piece big enough to cover front and back so you can cut it in half, or glue plastic to both sides and sand it to match. Either way you do it, oyu'll do more dremel work to fit the arm joint in place. Just keep the arm with the new shoulder close by so you can keep fitting it in until you get what you need.

I may need to do a step by step with pictures when I get the chance. I'll add it to my page. I might take an old Star Wars figure with out joints and do it both ways. Make one by hand creating the joint and make the other where I take the joints from another figure. I think it'll be less confusing that way.

by killuminati

yellow submarine ball joints,

all you need is good bits and a ball dremel

and you can make it look seamless

by Keenan

I'm in the process of using these now to articulate a McFarlane Alien. . .
http://www.hlj.com/product/YLSPPC-T10
Attachments
articalien.jpg
articalien.jpg (3.32 KiB) Viewed 987 times

by AdrienVeidt

Huh, apparently Kotobukiya makes their own type of ball joints as well. Here's a list of all their stuff found under 'Modeling Support Goods'.

by Oneforceleader

nova wrote:Depending on what your base parts, and what style figure you're creating, It may be easier to just take the unique parts of the limbs...usualy the feet and hands...cut them off and graft them to the new base figure...

I did somthing like that with my Furry Balls custom...

http://www.joecustoms.com/customs/custo ... 33&id=4141

I cut off Chewbacca's hands and feet and then carved the limbs down to be workable as lower legs and arms.


I got the articulation of the forarm to bicept done, haven't decided about the shoulder yet. How ever the thigh to knee joint is my next step, the challenge is the figure is bigger than some of the joe parts I have. I'll read on there are some idaes on this thread I haven't read yet.

by Oneforceleader

J_Man wrote:I keep posting this arm for various things, but here it is again:

Image

That's just regular plastic that a glued up. I built some squares up to make a block and glued them on the arm. I was just playing around so there isn't a rotation joint, but that could easily be done.

Anyway I had cut the elbow off the arm previous to this and glues the blocks onto each arm part. I used a dremel to shape the parts so that I could follow the creases and folds of the jacket. I shaped out the sections that matched up to each other so that I could have the joint. I used a piece of plastic and stuck through the arms and sanded the 2 sides flat to the arm. At this point you have a joint that's ready to go.

That's just another option. Naturally getting a figure and cutting the joints off is the easier way to go. It's best to look at dollar stores or something to find cheap figures to get joints off of.


Thats a great idea I think I have some Spiderman and Sandman figs that might match up with the leg size, I'll post once I try it.


Topic is Locked