Rules    FAQ
User: Guest ( Register )


It is currently Tue Nov 26, 2024 3:24 am (All times are UTC - 5 hours [ DST ])


Forum locked This topic is locked, you cannot edit posts or make further replies.  [ 54 posts ]  Go to page 1, 2, 3, 4  Next
Author Message
 Post subject: Tutorial: Custom flame effects (UPDATED w/ flame-stands)
PostPosted: Wed Nov 12, 2008 11:06 pm 
User avatar

Joined: Tue Jun 26, 2007 10:19 am
UPDATE 1/16: Added a tutorial for flame-stands (like for jetpacks and such) on the fourth page.

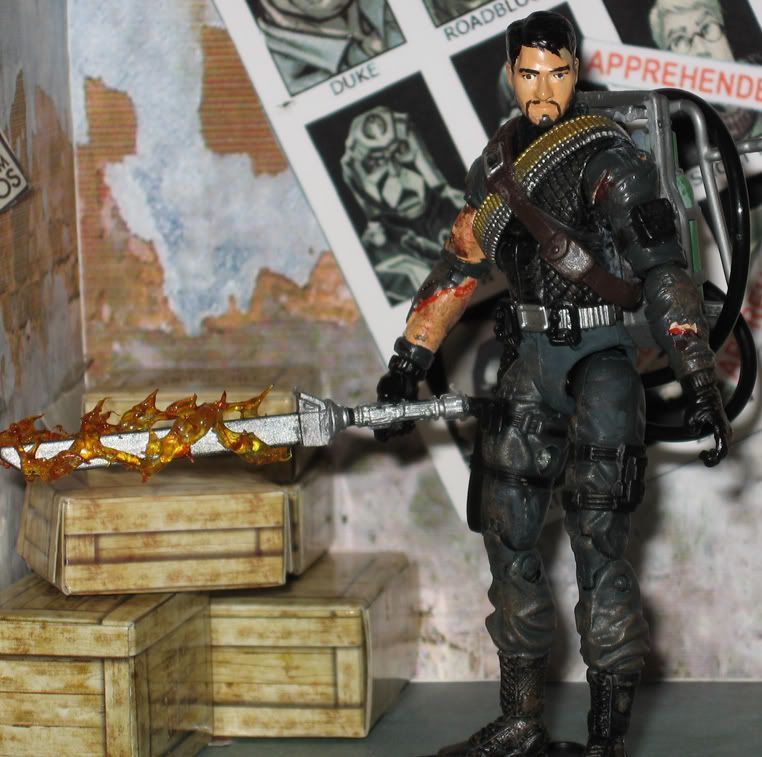
A day or so ago, I finished up my self custom, which included this burning sword weapon:
Image

It was a surprisingly easy effect to make, and I figured I'd write up a tutorial with pictures for anyone who wanted to make their own flame (or energy or what-have-you) effects.

The effects in this tutorial are designed to be removable. If you don't care about that and want the effect to be permanent, just skip the whole foil part and put the glue right on the figure.

WHAT YOU'LL NEED:

-A base piece (a figure, weapon, or even vehicle you want to add flames to)
-A hot glue gun and hot glue
-Transparent paint
-Aluminum foil

--------------------------------------------------
STEP 1: Evaluate your starting piece
---------------------------------------------------

Whether you're adding effects to a weapon (like I did on my self custom) a figure (like we'll do here) or a vehicle, you need to evaluate where the best places to attach them will be. The effects have to be able to cling onto the original piece while still being removable. It's best to study existing blast/flame effects to see how Hasbro and other toy companies have accomplished this. The little lightning cuffs that come with the Force Unleashed three-pack are great examples to study. Notice how they wrap onto the figure's limbs; you'll want to design your effects in a similar way.

-----------------------------------------------------
STEP 2: Foil
-----------------------------------------------------
Once you've decided on a piece to add effects to (in this case, I'm using a 25th BAT from the Arise, Serpentor, Arise pack) and where you want to add those effects, get out some aluminum foil and wrap those areas. Get a good, tight fit. The foil is there to keep the hotglue from adhering to your figure, while still providing a good, snug fit for the finished effects.
Image

-------------------------------------------------------
STEP 3: The frame
--------------------------------------------------------
Plug in your hot glue gun and let it warm up (but not too long). For this project, you want to keep the glue from getting too melty, so unplug the glue gun as needed to keep it at a low temperature (or if you have one of those fancy glue guns with temperature settings, use the lowest). Start building the frame of your effect onto the foil you just put down. Make sure you're creating a wrapping effect, but at the same time, still leaving a way to remove and reattach the piece. Don't worry too much about detail at this stage, just lay down some glue-paths. You'll want to make them thick, so to avoid breakage while at the same time giving the piece a good amount of give.
Image

---------------------------------------------------------
STEP 4: Details
----------------------------------------------------------
Once you've finished the frame and it has set up (which it probably will have by the time you're done if you're keeping your glue cool), you can start adding the flame details. To do this, put a blob of glue down (on top of the frame you just made) and then pull the glue gun outward, creating a sort of conical shape.
Image
Let it set up for a few seconds, then break the glue-strand and move onto the next flame. Don't worry if you get a lot of glue stringing, you can clean that up later. Just keep repeating this process and add as many little flames as you want to the frame. When you're done, you should have something that looks like this:
Image

------------------------------------------------------------
STEP 5: Removing the foil
---------------------------------------------------------------
After all of your flames are on and dried, take the time to break off any glue strings (just use your fingers, they pull right off). Then it's time to remove the effects from the foil. Since the glue doesn't stick very well to aluminum foil, this is pretty easy. Just flex the effects a few times to break the bond, then peel the foil away. Try to get it all in one piece (this avoids little scraps of foil that can be difficult to separate from the dried glue...if you get these, just scrape them away with an Xacto).
Image
When you're done, you should be left with something that looks like this:
Image
If any of your effects tear, just use the tip of your hot glue gun to melt them back together. That's the great thing about hot glue; it's very forgiving. When you're done with any repairs, fit the effects back onto the figure to make sure they still fit, like so
Image
(I just realized that one of my effects switched feet...oh well, that's the beauty of removable effects; they're interchangeable!)

------------------------------------------------------
STEP 6: Painting
-----------------------------------------------------
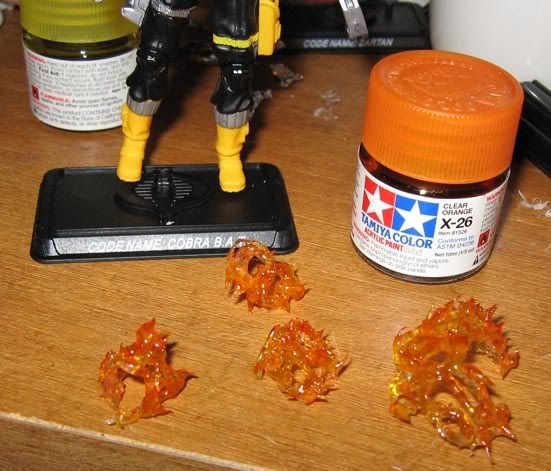
Get out your transparent paints (for flames we'll use yellow and orange, but if you're looking to do non-flame effects, pick your own colors). I use Tamiya, but there are other brands, too. Start with a good basecoat of yellow, and make sure to be thorough and get every surface:
Image
After that is done, switch to orange. With the orange, you don't have to be as thorough. Just slop it on, almost as if you are dry-brushing. You can also add some red if you want, but, in my opinion, it looks better with just yellow and orange.
Image

-------------------------------------------------------
STEP 7: Done!
---------------------------------------------------------
Once the paint is dry, go ahead and put your effects back on your figure/weapon/vehicle. Enjoy!
Image

I tried to be as thorough as possible, but if you have any questions, feel free to ask!

_________________
This is fine.


Last edited by Darko on Sat Jan 17, 2009 3:17 am, edited 2 times in total.

Top
 Profile Customs Feedback / Brawlingness  
 
 Post subject: Re: Tutorial: Custom flame effects
PostPosted: Wed Nov 12, 2008 11:25 pm 
User avatar
Plays a cop
Plays a cop

Joined: Tue Jun 26, 2007 10:19 am
Location: www.joearmory.com Mandeville, LA
Darko: My new hero................VERY, VERY, VERY, VERY "LASER BLAST" COOL.

_________________
Aspiring Hollywood starlet!
http://www.imdb.com/name/nm4597836/


Top
 Profile Customs Feedback / Brawlingness  
 
 Post subject: Re: Tutorial: Custom flame effects
PostPosted: Wed Nov 12, 2008 11:41 pm 
User avatar
HATES Mattel

Joined: Tue Jun 26, 2007 10:19 am
So inspired, and succinctly instructed; I wanna hump your leg. I'm definitely gonna have to try this for a Johnny Storm fig.

_________________


Top
 Profile Customs Feedback / Brawlingness  
 
 Post subject: Re: Tutorial: Custom flame effects
PostPosted: Thu Nov 13, 2008 12:07 am 
User avatar
Ripe with kibble / Bojack Strobman

Joined: Tue Jun 26, 2007 10:19 am
Location: !!BEYONDER!!
8-O

.amazing.

thank you for the incredible tutorial -- holy crap, Darko -- you rock!

this is so cool!

//now, where does a fellow find those translucent tamaya paints?

_________________


Top
 Profile Customs Feedback / Brawlingness  
 
 Post subject: Re: Tutorial: Custom flame effects
PostPosted: Thu Nov 13, 2008 12:53 am 
User avatar

Joined: Tue Jun 26, 2007 10:19 am
Glad everyone enjoys the tutorial!

As far as where to get the paints, I buy from Hobbytown USA, but I imagine any hobby shop would carry them. They make red, green, blue and gray (smoke) in transparent shades, too.

_________________
This is fine.


Top
 Profile Customs Feedback / Brawlingness  
 
 Post subject: Re: Tutorial: Custom flame effects
PostPosted: Thu Nov 13, 2008 1:41 am 
User avatar

Joined: Tue Jun 26, 2007 10:19 am
Location: Anderson MO
Freakin GREAT.. Now I gotta buy a glue gun.. lol

Great Stuff Darko it is very useful and I think once I get around to it Ill play with the styles some and see just what other effects can be accomplished...

Thank you for your contribution to my addiction.

_________________


Top
 Profile Customs Feedback / Brawlingness  
 
 Post subject: Re: Tutorial: Custom flame effects
PostPosted: Thu Nov 13, 2008 1:49 am 
User avatar
RPG Spin Master
RPG Spin Master

Joined: Tue Jun 26, 2007 10:19 am
Location: Security. Status. Escape.
Get that into the wiki.

That is very impressive. I love it when someone comes up with something new and that freakin cool.

I'm now wondering how I can use hot glue and wire twisties to make a jetpack flames stand.

- R

_________________


Top
 Profile Customs Feedback / Brawlingness  
 
 Post subject: Re: Tutorial: Custom flame effects
PostPosted: Thu Nov 13, 2008 1:51 am 
User avatar
Ripe with kibble / Bojack Strobman

Joined: Tue Jun 26, 2007 10:19 am
Location: !!BEYONDER!!
one more question -- does it matter what type of glue is used, a certain brand, or anything?

ie: some of the glue i have is clearer than the other type, in stick form -

_________________


Top
 Profile Customs Feedback / Brawlingness  
 
 Post subject: Re: Tutorial: Custom flame effects
PostPosted: Thu Nov 13, 2008 2:22 am 
User avatar

Joined: Tue Jun 26, 2007 10:19 am
joemichaels70 wrote:
one more question -- does it matter what type of glue is used, a certain brand, or anything?

ie: some of the glue i have is clearer than the other type, in stick form -


I don't think it would, but just in case, I use "Surebonder all purpose Stik mini glue sticks" designed for all temperatures. I got them at Michaels.

And as far as other effects, yeah, you can do a lot with hot glue. If I have time tomorrow I'll add on an electricity effect tutorial. Same idea, different shapes.

Oh yeah...and exactly how do I add this to the wiki? I've never done such before.

_________________
This is fine.


Top
 Profile Customs Feedback / Brawlingness  
 
 Post subject: Re: Tutorial: Custom flame effects
PostPosted: Thu Nov 13, 2008 9:03 am 
User avatar
Formerly JFAK075

Joined: Tue Jun 26, 2007 10:19 am
Location: Hawthorne, New Jersey
Yeah, this is one of the coolest tips-and-tricks I've seen in a while. Thanks, Darko!

_________________
Check out End of Days- an ongoing Diorama-Story set in the zombie apocalypse.
http://keenansendofdays.blogspot.com/

My customs- http://s1069.photobucket.com/albums/u468/keenan42/


Top
 Profile Customs Feedback / Brawlingness  
 
 Post subject: Re: Tutorial: Custom flame effects
PostPosted: Thu Nov 13, 2008 9:51 am 
User avatar
Plays a cop
Plays a cop

Joined: Tue Jun 26, 2007 10:19 am
Location: www.joearmory.com Mandeville, LA
I think Darko just earned most helpful customizer for the 08 JC awards.

_________________
Aspiring Hollywood starlet!
http://www.imdb.com/name/nm4597836/


Top
 Profile Customs Feedback / Brawlingness  
 
 Post subject: Re: Tutorial: Custom flame effects
PostPosted: Thu Nov 13, 2008 10:16 am 
User avatar
RPG Spin Master
RPG Spin Master

Joined: Tue Jun 26, 2007 10:19 am
Location: Security. Status. Escape.
Darko wrote:
Oh yeah...and exactly how do I add this to the wiki? I've never done such before.


http://wiki.joecustoms.com/wiki/Special:Userlogin

Create a login, and get editing. That is an awesome technique. I can't wait to see the electricity effect.

- R

_________________


Top
 Profile Customs Feedback / Brawlingness  
 
 Post subject: Re: Tutorial: Custom flame effects
PostPosted: Thu Nov 13, 2008 10:30 am 
User avatar

Joined: Tue Jun 26, 2007 10:19 am
Location: Considered deviant by bigots, zealots, and prudes.
Dude....genius. Simply genius.

_________________
Sometimes, the mad are driven that way.

http://capolan.tripod.com/- Some Stuff.


Top
 Profile Customs Feedback / Brawlingness  
 
 Post subject: Re: Tutorial: Custom flame effects
PostPosted: Thu Nov 13, 2008 10:59 am 

Joined: Tue Nov 06, 2007 12:52 pm
Location: France
Very nice tutorial! And something that doesn't seem completely out of my league too :-D


Top
 Profile Customs Feedback / Brawlingness  
 
 Post subject: Re: Tutorial: Custom flame effects
PostPosted: Thu Nov 13, 2008 2:23 pm 
User avatar
Plug
Plug

Joined: Tue Jun 26, 2007 10:19 am
Location: Maryland
raptor wrote:
Darko wrote:
Oh yeah...and exactly how do I add this to the wiki? I've never done such before.


http://wiki.joecustoms.com/wiki/Special:Userlogin

Create a login, and get editing. That is an awesome technique. I can't wait to see the electricity effect.

- R
Or just ask one of the wiki staff. :D http://wiki.joecustoms.com/wiki/Creating_flame_effects

_________________
:hijm70:


Top
 Profile Customs Feedback / Brawlingness  
 
Display posts from previous:  Sort by  
Forum locked This topic is locked, you cannot edit posts or make further replies.  [ 54 posts ]  Go to page 1, 2, 3, 4  Next

It is currently Tue Nov 26, 2024 3:24 am (All times are UTC - 5 hours [ DST ])


Who is online

Users browsing this forum: Bing [Bot] and 23 guests


You cannot post new topics in this forum
You cannot reply to topics in this forum
You cannot edit your posts in this forum
You cannot delete your posts in this forum
You cannot post attachments in this forum

Powered by phpBB © 2000, 2002, 2005, 2007 phpBB Group