Rules    FAQ
User: Guest ( Register )


It is currently Tue Nov 26, 2024 4:23 am (All times are UTC - 5 hours [ DST ])


Forum locked This topic is locked, you cannot edit posts or make further replies.  [ 54 posts ]  Go to page Previous  1, 2, 3, 4  Next
Author Message
 Post subject: Re: Tutorial: Custom flame effects
PostPosted: Thu Nov 13, 2008 3:33 pm 
User avatar

Joined: Tue Jun 26, 2007 10:19 am
Location: Castle Aaaaaaaaaaargh!
You really rock, Darko. You have given me so many ideas to make now.

_________________
You're never to old to have your Botty used as a Bongo.


Top
 Profile Customs Feedback / Brawlingness  
 
 Post subject: Re: Tutorial: Custom flame effects
PostPosted: Thu Nov 13, 2008 3:44 pm 
User avatar
RPG Spin Master
RPG Spin Master

Joined: Tue Jun 26, 2007 10:19 am
Location: Security. Status. Escape.
Hmmm. I'm thinking that if you hung a paperclip upside down, and put the glue on the end, then painted it up in a flame effect, it would look like one of the blast effects from the Star Wars line...

And as long as were on the subject, has anyone tried to make a head mold using tinfoil and hot glue?

- R

_________________


Top
 Profile Customs Feedback / Brawlingness  
 
 Post subject: Re: Tutorial: Custom flame effects
PostPosted: Thu Nov 13, 2008 3:45 pm 
User avatar
JC Podcaster
JC Podcaster

Joined: Tue Jun 26, 2007 10:19 am
Location: Wild Adventures, GA
This is an incredible idea and an awesome tutorial. A dio-builder's dream come true. This has Wiki written all over it.

_________________
Looking for 2 Retalitation Night-Vipers and multiple MU Professor X's. Help if you can.


Top
 Profile Customs Feedback / Brawlingness  
 
 Post subject: Re: Tutorial: Custom flame effects
PostPosted: Thu Nov 13, 2008 4:09 pm 
User avatar
Special Limited Edition Co-Host / Membership Has Its Privileges

Joined: Mon Nov 19, 2007 3:31 pm
Location: Fort Wayne
raptor wrote:
Hmmm. I'm thinking that if you hung a paperclip upside down, and put the glue on the end, then painted it up in a flame effect, it would look like one of the blast effects from the Star Wars line...

And as long as were on the subject, has anyone tried to make a head mold using tinfoil and hot glue?

- R


Wouldn't the tin foil prevent small details from coming through, and also result in a mold of any wrinkles in the foil? I'd be more inclined to try it using a thin coat of vasoline instead of the foil for that type of thing.

_________________
Kwinn_Lives wrote:
you have now won more JCAs than anyone in the history of the award.

Mysterious Stranger wrote:
You sir are the definition of a Renaissance Nerd... you do it all so damn well.


Top
 Profile Customs Feedback / Brawlingness  
 
 Post subject: Re: Tutorial: Custom flame effects
PostPosted: Thu Nov 13, 2008 4:54 pm 
User avatar

Joined: Tue Jun 26, 2007 10:19 am
raptor wrote:
And as long as were on the subject, has anyone tried to make a head mold using tinfoil and hot glue?

- R


I haven't tried a head, but I did try reproducing a cobra symbol from one of the 25th figure stands. Unfortunately, hotglue in the quantities necessary to create something that size WILL adhere to the foil pretty well. Also, yeah, it's not great for getting small details. Thanks to pluv for adding the tutorial to the wiki!

_________________
This is fine.


Top
 Profile Customs Feedback / Brawlingness  
 
 Post subject: Re: Tutorial: Custom flame effects
PostPosted: Thu Nov 13, 2008 5:03 pm 
User avatar
Hi, beav. Playing cards?

Joined: Mon May 21, 2007 10:54 am
Location: My Ol' Kenucky Home
raptor wrote:
Darko wrote:
Oh yeah...and exactly how do I add this to the wiki? I've never done such before.


http://wiki.joecustoms.com/wiki/Special:Userlogin

Create a login, and get editing. That is an awesome technique. I can't wait to see the electricity effect.

- R


Note: You don't have to create an account, you just login using the same info as the Forums or Gallery.

_________________
:beavfez:

Ignore the man behind the curtain...


Top
 Profile Customs Feedback / Brawlingness  
 
 Post subject: Re: Tutorial: Custom flame effects
PostPosted: Thu Nov 13, 2008 7:20 pm 
User avatar

Joined: Tue Jun 26, 2007 10:19 am
Okay, here's the electricity/energy tutorial. Really, it's just about the same as the flame tutorial, so I won't go into as much depth on this one except on the new things. I have added how to make a 'projected' flame/energy effect.

---------------------------------------------------
STEP 1: Prep and Foil
----------------------------------------------------
Just like with the flames, you want to evaluate what parts of your original piece you want the effects to wrap onto, and then foil them off.


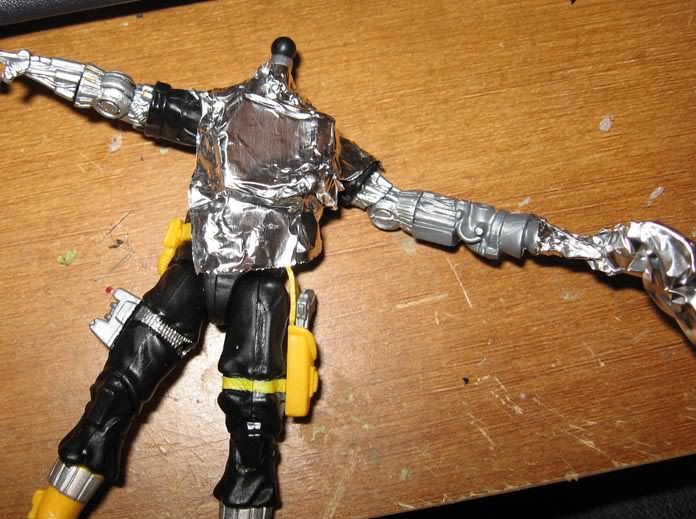
If you want an effect that projects out from your piece (like sith lightning), then just wrap the original piece in foil, starting with the part that you want the effect to project out of (hand, gun barrel, etc). Then make a large blob of foil that extends outward into the direction you want the projection to go. Make it pretty thick, as it needs to be able to hold its shape and the weight of the hotglue. Like so:
Image
(of course, in this example, I could have made it a lot easier by removing the bat's weapon attachment, but since not all figures have removable hands, I left it on).

----------------------------------------------------------------
STEP 2: Hot glue
----------------------------------------------------------------
Electricity is a lot easier than flames in this regard. Just lay down tracks of hot glue in a electricity-like pattern (looking at SW lightning effects helps) and try to keep the glue laying flat. You can vary the width of the glue tracks for a more realistic look. Like with the flames, make sure to make the glue frame wrap around your piece, not just sit on top, so the finished product with hold on by itself.

For the energy projection, start with a spiral that with coil around the original piece (in this case, the end of the BAT's weapon attachment). After that, just start branching off of that coil, adding glue tracks to the blob of foil that extends outward. Remember to make use of all sides of the foil blob. You're going to want to make sure that all of the glue tracks are pretty thick here, since they have to be able to hold their own weight. Make especially sure that the glue that makes up the coil is nice and thick, since it has to hold the entire effect.
Image

-----------------------------------------------------------------------
STEP 3: Removing effects
-------------------------------------------------------------------------
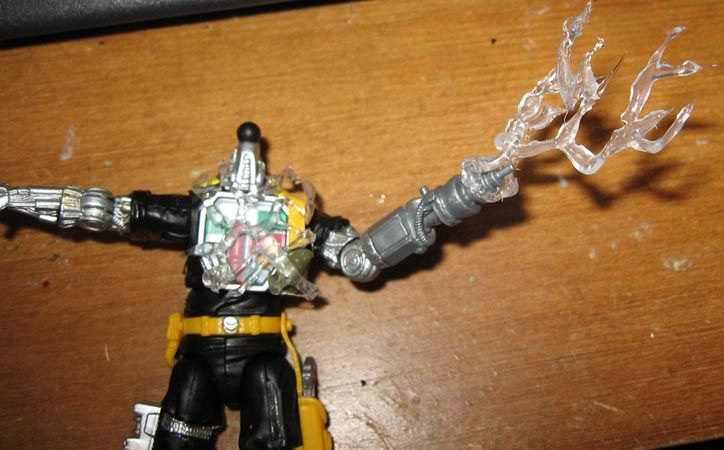
Remember to let the glue fully solidify and begin popping the foil off. With the projected effect, it may take a bit more effort. Don't be afraid to bend and flex it to loosen the foil; you can always fix any tears or weak spots with dabs of hotglue afterward. Remove any stringing, and fit the effects onto the original piece to make sure they still fit. If they need any repairs made to help them fit better, do that now.
Image

---------------------------------------------------------------------------
STEP 4: Painting
---------------------------------------------------------------------------
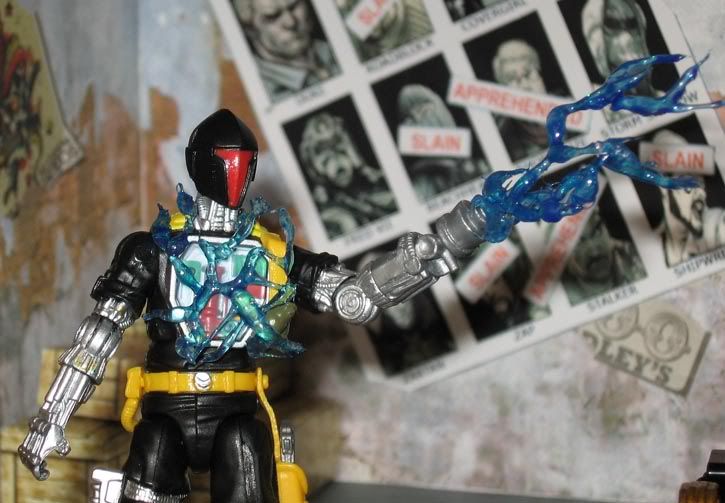
I used Tamiya transparent blue for this. Just slop it on, and make sure you get every surface. If you don't, it'll show up more than it does in the flame example. Once you're finished painting, you're done!
Image

Thanks for all the feedback! I'm glad I can contribute something to the community. Feel free to ask any questions!

_________________
This is fine.


Top
 Profile Customs Feedback / Brawlingness  
 
 Post subject: Re: Tutorial: Custom flame effects (UPDATED w/ electricity)
PostPosted: Thu Nov 13, 2008 7:50 pm 
User avatar

Joined: Tue Sep 04, 2007 10:34 pm
Fantastic idea. Fantastic How-to.

Great job man :monocle:


Top
 Profile Customs Feedback / Brawlingness  
 
 Post subject: Re: Tutorial: Custom flame effects (UPDATED w/ electricity)
PostPosted: Thu Nov 13, 2008 8:52 pm 
User avatar
Plays a cop
Plays a cop

Joined: Tue Jun 26, 2007 10:19 am
Location: www.joearmory.com Mandeville, LA
Very cool, dude, very cool!

Now that you've unleashed this new idea, I can't wait to see what the lunatics here do with it!

A+

_________________
Aspiring Hollywood starlet!
http://www.imdb.com/name/nm4597836/


Top
 Profile Customs Feedback / Brawlingness  
 
 Post subject: Re: Tutorial: Custom flame effects (UPDATED w/ electricity)
PostPosted: Thu Nov 13, 2008 9:12 pm 
User avatar
HATES Mattel

Joined: Tue Jun 26, 2007 10:19 am
Darko, for your genius and generosity in sharing it with us:
Image

_________________


Top
 Profile Customs Feedback / Brawlingness  
 
 Post subject: Re: Tutorial: Custom flame effects (UPDATED w/ electricity)
PostPosted: Fri Nov 14, 2008 12:38 am 
User avatar
RPG Spin Master
RPG Spin Master

Joined: Tue Jun 26, 2007 10:19 am
Location: Security. Status. Escape.
Awesome.

Can you try to do killer plants like the ones from the DVD pack? I would imagine that it would be a similar process.

- R

_________________


Top
 Profile Customs Feedback / Brawlingness  
 
 Post subject: Re: Tutorial: Custom flame effects (UPDATED w/ electricity)
PostPosted: Fri Nov 14, 2008 12:41 am 
User avatar
Ripe with kibble / Bojack Strobman

Joined: Tue Jun 26, 2007 10:19 am
Location: !!BEYONDER!!
[---------------------------------------------------------------------------------------]


seriously -- see that line above ^ ? that's the bar. you just raised it.

win, darko -- serious win.

_________________


Top
 Profile Customs Feedback / Brawlingness  
 
 Post subject: Re: Tutorial: Custom flame effects (UPDATED w/ electricity)
PostPosted: Fri Nov 14, 2008 8:15 pm 
User avatar
Plug
Plug

Joined: Tue Jun 26, 2007 10:19 am
Location: Maryland
Awesome. Added this one to the wiki as well. http://wiki.joecustoms.com/wiki/Creatin ... ty_effects

_________________
:hijm70:


Top
 Profile Customs Feedback / Brawlingness  
 
 Post subject: Re: Tutorial: Custom flame effects (UPDATED w/ electricity)
PostPosted: Sat Nov 15, 2008 12:52 pm 
User avatar

Joined: Tue Jun 26, 2007 10:19 am
Location: Kirkland, WA
Is there a "best new technique" category for the Joe Customs Awards?

If there's not, there should be.

If there is, I think this would be hard to beat as this year's winner.

Such a simple concept, such amazing results. Looking forward to playing with this idea.

_________________


Top
 Profile Customs Feedback / Brawlingness  
 
 Post subject: Re: Tutorial: Custom flame effects (UPDATED w/ electricity)
PostPosted: Sun Nov 16, 2008 1:42 pm 
User avatar
Narceron.com
Narceron.com

Joined: Tue Jun 26, 2007 10:19 am
Location: Western Kentucky
Agreed, this a simple and yet INCREDIBLE process.

Now I don't have to buy any more emperor figures.

Darko, its times like this that you are allowed to high five yourself.


And Raptor, as far as molding a head, I'm not sure, but if Hot glue won't bond with vegetable oil, you could make a pretty simple(ie less detailed) mold. Might be able to pull off something usable.


Oh, and Darko, the cobra symbols would sure love to be greenstuff molded, give that a try, :)

_________________
Hulk Hogan wrote:
So Beav is Narceron?

Chief wrote:
Now, I don't know if I've ever mentioned it here in the forums, but I have this intense hatred of short people.*


Top
 Profile Customs Feedback / Brawlingness  
 
Display posts from previous:  Sort by  
Forum locked This topic is locked, you cannot edit posts or make further replies.  [ 54 posts ]  Go to page Previous  1, 2, 3, 4  Next

It is currently Tue Nov 26, 2024 4:23 am (All times are UTC - 5 hours [ DST ])


Who is online

Users browsing this forum: No registered users and 26 guests


You cannot post new topics in this forum
You cannot reply to topics in this forum
You cannot edit your posts in this forum
You cannot delete your posts in this forum
You cannot post attachments in this forum

Powered by phpBB © 2000, 2002, 2005, 2007 phpBB Group